Android Studio Git Tutorial
This tutorial is to explain how to use Git version control with Android Studio. Git is a free distributed version control system. If you are not using version control for software development, I urge you to start learning and using it. Git is a good choice from among the list of version control software like CVS, Subversion and ClearCase.

Android Studio is best in comparison with Eclipse when it comes to Android development. Android Studio is the official IDE for Android development and it is based on IntelliJ IDEA. It is easy to migrate and it will take just a couple of days to get used to Android Studio. To help you settle with it, I have listed essential Android Studio shortcuts in an earlier tutorial.
Git with Android Studio
Android studio comes with Git client. All we need to do is just enable and start using it. As a prerequisite, you need to have Git installed in local system. You can download Git from http://git-scm.com/downloads and install it.
0. For the Experienced
If you are an experienced developer, comfortable with Android Studio and Git, then this section summarizes the whole tutorial. For the rest of us, just skip this part and proceed with the detailed steps.
- In Android Studio enable the version control for the project by, VCS –> Enable Version Control Integration
- Open command line/terminal and add the project to Git repository by, git remote add <name> <remote_url>
- Add files by, VCS –> Git –> Add and commit/push by, VCS –> Commit Changes
1. Test if Git is Configured
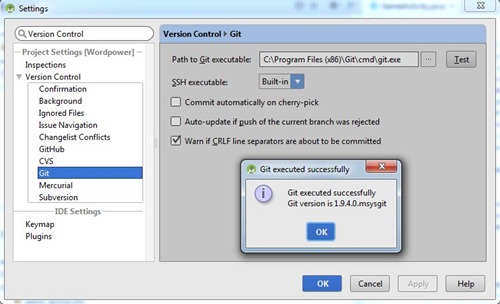
In Android Studio, go to ‘File’ –> ‘Settings’ –> ‘Version Control’ –> ‘Git’. Then click ‘Test’ to ensure that Git is configured properly in Android Studio.
2. Enable Version Control Integration
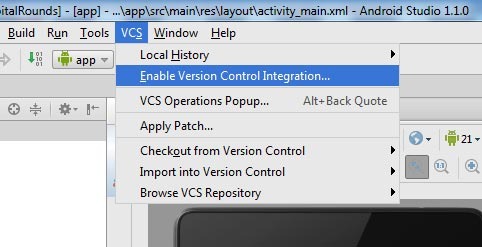
Prior to using Git or any other version control with an existing project, ‘version control integration’ should be enabled. In Android Studio, got to ‘VCS’ –> ‘Enable Version Control Integration’. This step is for an already existing project in Android Studio, that is not is integrated with any version control.
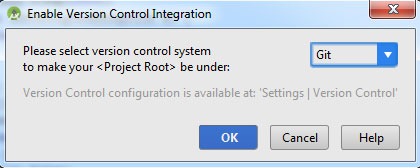
On enable, we will get a dialog window with options to choose like CVS, Git, Mercurial and Subversion. Now in this tutorial, we have take Git as example.
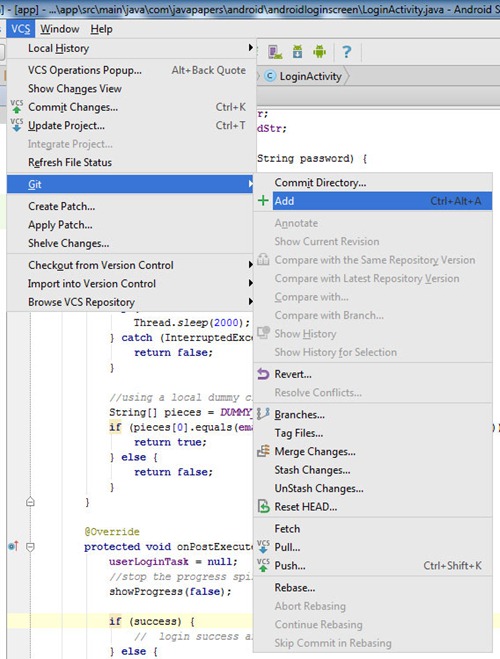
On successful enable the options under VCS menu will change showing the Git options to add, commit, etc. The color of the files in Android Studio project explorer will change to brown from previous black. This indicates that the files are new and yet to be added to Git server.
3. gitignore – Exclude Files from Git
This is an important step before adding the project files to Git version control. We do not want all the files from Android Studio to be added to Git. Files like generated code, binary files (executables) should not be added to Git (version control). Git provides a feature using which we can inform Git that the list of files given should be excluded in version control.
Create a TXT file and name of the file should be “.gitignore”. There is no name for this file and ‘gitignore’ is the extension. Its just a text file with list of file names to be excluded. You can put this file in the project root folder in Android Studio. Following is my .gitignore file for Android projects. Its almost the same for all Android projects.
.gradle
/local.properties
/.idea/workspace.xml
/.idea/libraries
.DS_Store
/build
4.1 Git with Local
Now the project is ready to use with Git version control. Now it depends on your choice of the Git server. If you choose to use Git in just your local system (which is highly unlikely), you are all set. Go to “VCS –> Git –> Add” and the files are now added to Git and then you need to commit the changes. Now go to “VCS –> Commit Changes” and you will get a dialog to enter the comments and to commit. Done and the project is added to Git.
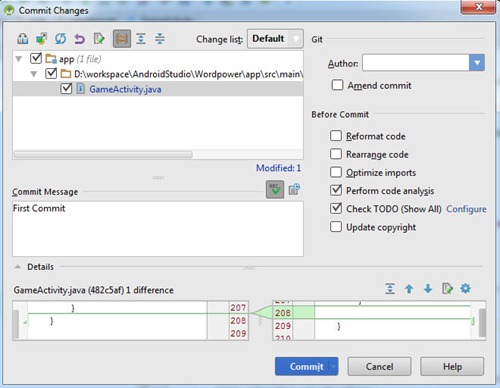
If you wish to add the project to a remote repository that is residing somewhere on the network you need to add the project to remote repository and then use it. In the following sections, I will give some popular Git servers and show how to use them.
4.2 Git using GitHub with Android Studio
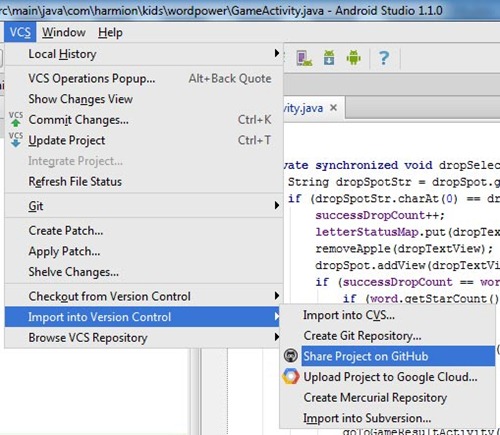
GitHub is an online service for project hosing using Git version control. To host the project on Git, a Git account should be created in github.com. Now you can share the Android project on GitHub. Go to “VCS –> Import into Version Control –> Share Project on GitHub”
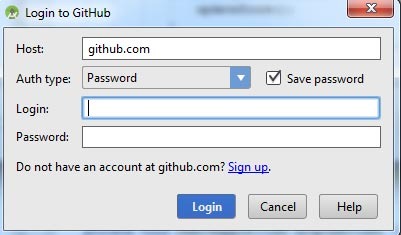
Login with GitHub credentials:
Create a new repository on GitHub and push the project to the GitHub repository.

4.3 Git using Bitbucket or Any Repo with Android Studio
Bitbucket does not have a direct import feature as GitHub has. But it is too simple to do. For remote Git repositories like Bitbucket which does not have an explicit import feature in Android Studio, we can use the command line and add the project to the remote repository. This is also applicable if you are in a company network and you have your own remote Git server.
Go to terminal, change to project root in Android Studio and execute the following command. The URL is the Git remote repository.
git remote add origin https://user@bitbucket.org/user/wordpower.git
Comments on "Android Studio Git Tutorial"
Comments are closed for "Android Studio Git Tutorial".


Thanks for posting this tutorial. Its nicely explained and very easy to understand in the simple words that you have written, Joe.
Thanks for the publishing to GitHub part. I tried and it works! Really helpful.
Thanks lot ..
I may have missed it but I don’t recall reading how to put the txt file in the root folder of Android for Git, GitHub.
An explanation or short walk through would also be very helpful. Thanks for all of your help.