@Profile Annotation Improvements in Spring 4
As part of Spring 4 features, we are going to see about the updates to “@Profile Annotation” with some suitable and simple real time examples. This Spring tutorial has the following topics,
- Introduction to @Profile annotation
- Prerequisites
- Spring 3.1/3.2 Profiles
@Profile Annotation
Spring 3.1 introduced the annotation @Profile. Profile annotation is a logical grouping that can be activated programmatically. It can be used on type-level annotation on any class or it can be used as a meta-annotation for composing custom stereotype annotations or as a method-level annotation on any @Bean method. Essence is, @Profile is used to conditionally activate/register.
Spring 3.x framework has the following two approaches for conditional checking,
- Spring SpEL Ternary Operator
- Spring 3.1/3.2 Profiles
Spring 4.0 has provided some updates to Spring 3.x @Profile annotation. Before discussing about Spring 4 updates, first we will see Spring 3.x approaches with some examples. Before Spring 3.1, if we want to create Environment based application build, we should use Maven Profiles. Then, Spring framework introduced similar kind of concept with @Profile annotation.
Prerequisites
Before going through Spring 4.0 @Profile annotation, we need to have some basic knowledge of the following concepts,
- SpEL (Spring Expression Language)
- Java-based Configuration with @Configuration, @Bean
- Spring Test Module
SpEL – Spring Expression Language
SpEL stands for Spring Expression Language. SpEL is an expression language used to query and manipulate Spring Beans at runtime. The Spring expression language is the Spring’s answer to the Java expression languages available. It can also be used independent of Spring framework on general Java projects.

A Spring expression starts with a hash ‘#’ and contained within curly {} braces. We can use same syntax for both Spring XML configuration and Annotations.
For Example: Spring XML Configuration
<bean id=“emp” class=”Employee “>
	<property name=”id” value=”101”/>
<property name=”name” value=”Jack Matthews”/>
	<property name=salary” value=”#{ 35000 + empDetails.bonus }”/>
<bean>
<bean id=“empDetails” class=”EmployeeDetails“>
	<property name=”id” value=”101”/>
	<property name=bonus” value=”#{ 35000 + empDetails.bonus }”/>
</bean>
Here we are referring empDetails bean’s bonus property value in emp bean. We are using Spring’s @Value annotation to define SpEL Expression in Annotation based applications. We will discuss this with an example in coming section.
Java-based Configuration
In an earlier tutorial, we discussed how to use Spring Framework Autowiring with @Autowired, @Component etc annotations as part of Spring 4 features series. It is not ideal for all scenarios. Because sometimes, we need to use some third-party components to use Spring Autowiring feature. In those scenarios, we can use Java-Based configurations. Following is an example scenario to explain this situation.
To work with Java-based Configuration, we should familiar with the following two annotations,
- @Configuration
- @Bean
@Configuration:
@Configuration annotation is used to annotate a Java configuration class to tell Spring IOC Container that this class has Bean definitions which should be loaded into Spring’s application context.
package com.javapapers.spring4.config;
import org.springframework.context.annotation.Configuration;
@Configuaration
Public class DevDatabaseConfig{
}
Here DevDatabaseConfig class is annotated with @Configuration annotation so it is known as Java-based configuration class. When our Spring application starts, Spring IOC container loads all beans defined in this class into application context so that other components can utilize them.
@Bean:
To define or configure beans.
package com.javapapers.spring4.config;
import org.springframework.context.annotation.Configuration;
@Configuaration
public class DevDatabaseConfig{
	@Bean
	public DataSource dataSource(){
	// Code to create DataSource
	}
}
In simple terminology, @Configuration classes are equal to Spring’s <beans/> and @Bean is equal to <bean/> element in Spring XML Configuration.
Spring Profiles
Most projects will have different environments like DEV, QA, PREPROD and PRODUCTION. Most of the projects have different databases for each Environment. First developer starts developing projects on DEV environment which uses DEV database. Once development is done, they will move code to QA environment which uses different database. Once QA is done successfully, they will move to PREPRODUCTION environment, which uses PREPRO database to do End-to-End and performance testing. Once everything is done and happy to go live, it will be deployed on LIVE or PRODUCTION Environment which uses PROD database.Then creating DataSource object for each environment requires different database details.
If we change Database details, then we need to rebuild and deploy application. We cannot use same application WAR or EAR file for all environments.To solve this kind of environment related setup dependencies, Spring 3.1 has introduced a new annotation. That is @Profile annotation. It can be used to develop an “If-Then-Else” conditional checking to configure. We cannot implement this scenario by using SpEL Ternary Operator.
To work with Profiles, Spring 3.1 Framework has provided the following two properties
- spring.profiles.default
- spring.profiles.active
spring.profiles.active represents active profile.
spring.profiles.default represents default profile.
If we don’t specify active profile, then Spring IOC Container will look for default profile. We need to provide values to one of these properties as JVM Parameters. In Eclipse or Spring STS IDEs, we need to pass these values as shown below,
-Dspring.profiles.active=dev
Then Spring IOC Container uses this profile value and creates only those beans to run the application. To activate the profiles in JUnits, Spring Framework has provided another annotation: @ActiveProfiles. Instead of activating a profile using JVM Parameters, we can use this annotation to active a profile. We will discuss all these with one example.
Spring 3.2 Profiles Example Application
<project xmlns="http://maven.apache.org/POM/4.0.0"
xmlns:xsi="http://www.w3.org/2001/XMLSchema-instance"
xsi:schemaLocation="http://maven.apache.org/POM/4.0.0 http://maven.apache.org/xsd/maven-4.0.0.xsd">
  <modelVersion>4.0.0</modelVersion>
  <groupId>com.javapapers.spring4</groupId>
  <artifactId>Spring3.0SPELTernaryOperator</artifactId>
  <version>1.0.0</version>

  <properties>
		<spring-framework.version>3.2.13.RELEASE</spring-framework.version>
		<junit.version>4.11</junit.version>
	</properties>

	<dependencies>
		<dependency>
			<groupId>org.springframework</groupId>
			<artifactId>spring-context</artifactId>
			<version>${spring-framework.version}</version>
		</dependency>
		<dependency>
			<groupId>org.springframework</groupId>
			<artifactId>spring-test</artifactId>
			<version>${spring-framework.version}</version>
			<scope>test</scope>
		</dependency>
		<dependency>
			<groupId>junit</groupId>
			<artifactId>junit</artifactId>
			<version>${junit.version}</version>
			<scope>test</scope>
		</dependency>
	</dependencies>
</project>
package com.javapapers.spring4.domain;

public class Employee {

	private int id;
	private String name;
	private double sal;

	public Employee(int id,String name,double sal) {
		this.id = id;
		this.name = name;
		this.sal = sal;
	}

	public int getId() {
		return id;
	}

	public String getName() {
		return name;
	}

	public double getSal() {
		return sal;
	}
}
For simplicity purpose, we need to use this DataSource rather than javax.sql.DataSource because we don’t need to communicate with Database. We have just created in-memory databases with Java Classes. DevDatabaseUtil represents Dev database and ProductionDatabaseUtil class represents Production database.
package com.javapapers.spring4.util;

import java.util.List;
import com.javapapers.spring4.domain.Employee;

public interface DataSource {
	List<Employee> getEmployeeDetails();
}
package com.javapapers.spring4.util;

import java.util.ArrayList;
import java.util.List;
import com.javapapers.spring4.domain.Employee;

public class DevDatabaseUtil implements DataSource {

	@Override
	public List<Employee> getEmployeeDetails(){
		List<Employee> empDetails = new ArrayList<>();
		Employee emp1 = new Employee(111,"Abc",11000);
		Employee emp2 = new Employee(222,"Xyz",22000);
		empDetails.add(emp1);
		empDetails.add(emp2);

		return empDetails;
	}
}
package com.javapapers.spring4.util;

import java.util.ArrayList;
import java.util.List;
import com.javapapers.spring4.domain.Employee;

public class ProductionDatabaseUtil implements DataSource {

	@Override
	public List<Employee> getEmployeeDetails(){
		List<Employee> empDetails = new ArrayList<>();
		Employee emp1 = new Employee(9001,"Ramu",45000);
		Employee emp2 = new Employee(9002,"Charan",35000);
		Employee emp3 = new Employee(9003,"Joe",55000);
		empDetails.add(emp1);
		empDetails.add(emp2);
		empDetails.add(emp3);

		return empDetails;
	}
}
EmployeeDAO acts as a DAO layer component. It uses our DataSource class and interacts with respective Databases based on active profiles.
package com.javapapers.spring4.dao;

import java.util.List;
import com.javapapers.spring4.domain.Employee;
import com.javapapers.spring4.util.DataSource;

public class EmployeeDAO {

	private DataSource dataSource;

	public EmployeeDAO(DataSource dataSource) {
		this.dataSource = dataSource;
	}
	public List<Employee> getEmployeeDetails() {
		return dataSource.getEmployeeDetails();
	}

}
EmployeeService acts as a Service layer component. It uses EmployeeDAO class and perform operations based on active profiles.
package com.javapapers.spring4.service;

import java.util.List;
import com.javapapers.spring4.dao.EmployeeDAO;
import com.javapapers.spring4.domain.Employee;

public class EmployeeService {

	private EmployeeDAO employeeDAO;

	public EmployeeService(EmployeeDAO employeeDAO) {
		this.employeeDAO = employeeDAO;
	}

	public List<Employee> getEmployeeDetails(){
		return employeeDAO.getEmployeeDetails();
	}

}
Now it’s time to use Spring’s Java-based configuration to configure beans with profiles DevEmployeeConfig defines “dev” profile to work with DEV Database and ProdEmployeeConfig defines “prod” profile to work with Production database.
package com.javapapers.spring4.config;

import org.springframework.context.annotation.Bean;
import org.springframework.context.annotation.Configuration;
import org.springframework.context.annotation.Profile;

import com.javapapers.spring4.util.DataSource;
import com.javapapers.spring4.util.DevDatabaseUtil;

@Configuration
@Profile("dev")
public abstract class DevEmployeeConfig{
	  @Bean
	  public DataSource dataSource() {
		  return new DevDatabaseUtil();
	  }

}
package com.javapapers.spring4.config;

import org.springframework.context.annotation.Bean;
import org.springframework.context.annotation.Configuration;
import org.springframework.context.annotation.Profile;

import com.javapapers.spring4.util.DataSource;
import com.javapapers.spring4.util.ProductionDatabaseUtil;

@Configuration
@Profile("prod")
public abstract class ProdEmployeeConfig{
	  @Bean
	  public DataSource dataSource() {
		  return new ProductionDatabaseUtil();
	  }
}
Define other beans which should be created irrespective of the active profile as shown below. If you see EmployeeService and EmployeeDAO bean’s related methods, they are referring other beans by referring object reference or by calling methods like employeeService() method is calling employeeDAO() method.
package com.javapapers.spring4.config;

import org.springframework.beans.factory.annotation.Autowired;
import org.springframework.context.annotation.Bean;
import org.springframework.context.annotation.Configuration;
import com.javapapers.spring4.dao.EmployeeDAO;
import com.javapapers.spring4.service.EmployeeService;
import com.javapapers.spring4.util.DataSource;

@Configuration
public class EmployeeConfig{
	  @Autowired
	  private DataSource dataSource;

	  @Bean
	  public EmployeeService employeeService() {
		  return new EmployeeService(employeeDAO());
	  }

	  @Bean
	  public EmployeeDAO employeeDAO() {
		  return new EmployeeDAO(dataSource);
	  }
}
To write JUnits for Spring’s Profiles, Spring 3.1 has introduced the following updates.
- @ContextConfiguration(classes={SetOfJavaConfigClassesHere},loader=loaderClassHere). Even though Spring 3.0 introduced this annotation, but Spring 3.1 updated this with loader element to support Java-based annotations.
- @ActivateProfiles(Give-ProfileNameHere)
Spring 3.1 introduced this new annotation. It specifies which profile is active in the given Junit class to create required beans to test the application. Spring 3.1 also introduced a new class: AnnotationConfigContextLoader to load Java-based configurations into Spring application context to support Spring Profiles. This Junit is used to test “dev” profile to work with DEV Database.
import static org.junit.Assert.assertEquals;
import static org.junit.Assert.assertNotNull;

import java.util.List;

import org.junit.Test;
import org.junit.runner.RunWith;
import org.springframework.beans.factory.annotation.Autowired;
import org.springframework.context.ApplicationContext;
import org.springframework.test.context.ActiveProfiles;
import org.springframework.test.context.ContextConfiguration;
import org.springframework.test.context.junit4.SpringJUnit4ClassRunner;
import org.springframework.test.context.support.AnnotationConfigContextLoader;

import com.javapapers.spring4.config.DevEmployeeConfig;
import com.javapapers.spring4.config.EmployeeConfig;
import com.javapapers.spring4.config.ProdEmployeeConfig;
import com.javapapers.spring4.domain.Employee;
import com.javapapers.spring4.service.EmployeeService;

@RunWith(SpringJUnit4ClassRunner.class)
@ContextConfiguration(classes= {EmployeeConfig.class,DevEmployeeConfig.class,ProdEmployeeConfig.class},loader=AnnotationConfigContextLoader.class)
@ActiveProfiles(value="dev")
public class Spring3DevProfilesTest {

	@Autowired
	private ApplicationContext applicationContext;

	  @Test
	  public void testDevDataSource() {
		  EmployeeService service = (EmployeeService)applicationContext.getBean("employeeService");
		  assertNotNull(service);
		  List<Employee> employeeDetails = service.getEmployeeDetails();
		  assertEquals(2, employeeDetails.size());
		  assertEquals("Abc", employeeDetails.get(0).getName());
		  assertEquals("Xyz", employeeDetails.get(1).getName());
	  }
}
This Junit is used to test “prod” profile to work with Production Database.
import static org.junit.Assert.assertEquals;
import static org.junit.Assert.assertNotNull;

import java.util.List;

import org.junit.Test;
import org.junit.runner.RunWith;
import org.springframework.beans.factory.annotation.Autowired;
import org.springframework.context.ApplicationContext;
import org.springframework.test.context.ActiveProfiles;
import org.springframework.test.context.ContextConfiguration;
import org.springframework.test.context.junit4.SpringJUnit4ClassRunner;
import org.springframework.test.context.support.AnnotationConfigContextLoader;

import com.javapapers.spring4.config.DevEmployeeConfig;
import com.javapapers.spring4.config.ProdEmployeeConfig;
import com.javapapers.spring4.domain.Employee;
import com.javapapers.spring4.service.EmployeeService;

@RunWith(SpringJUnit4ClassRunner.class)
@ContextConfiguration(classes= {DevEmployeeConfig.class,ProdEmployeeConfig.class},loader=AnnotationConfigContextLoader.class)
@ActiveProfiles(value="prod")
public class Spring3ProdProfilesTest {

	@Autowired
	private ApplicationContext applicationContext;

	  @Test
	  public void testProdDataSource() {
		  EmployeeService service = (EmployeeService)applicationContext.getBean("employeeService");
		  assertNotNull(service);
		  List<Employee> employeeDetails = service.getEmployeeDetails();
		  assertEquals(3, employeeDetails.size());
		  assertEquals("Ramu", employeeDetails.get(0).getName());
		  assertEquals("Charan", employeeDetails.get(1).getName());
		  assertEquals("Joe", employeeDetails.get(2).getName());
	  }
}
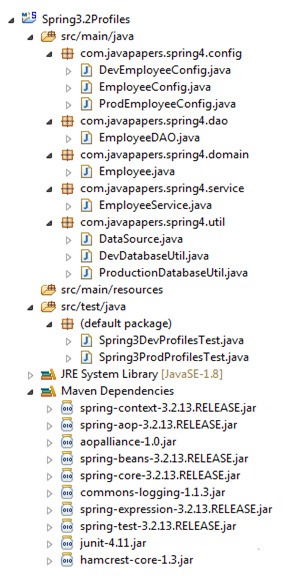
Finally, project looks like,

Spring 4.0 Profiles
In Spring 3.1, we can use the @Profile annotation only at the class level. We cannot use at method level. From Spring 4.0 onwards, we can use @Profile annotation at the class level and the method level.
Spring 4.0 Profiles Example
Lets make some minor modifications to the above given Spring 3.2 Profiles example.
In pom.xml change the Spring version as,
<spring-framework.version>4.0.9.RELEASE</spring-framework.version>
We can use @Profile annotation at @Bean methods level, we don’t need two separate classes to work with two different databases. We can define two @Bean methods in the same class. Combine both Dev and Prod data source definitions into one class. As we cannot use same method name and signature twice in same class to define two different data sources, we need to use different method names, but define @Bean’s “name” attribute as shown below.
package com.javapapers.spring4.config;

import org.springframework.context.annotation.Bean;
import org.springframework.context.annotation.Configuration;
import org.springframework.context.annotation.Profile;
import com.javapapers.spring4.util.DataSource;
import com.javapapers.spring4.util.DevDatabaseUtil;
import com.javapapers.spring4.util.ProductionDatabaseUtil;

@Configuration
publicclass EmployeeDataSourceConfig {

	@Bean(name="dataSource")
	@Profile("dev")
	public DataSource getDevDataSource() {
		returnnew DevDatabaseUtil();
	  }

	@Bean(name="dataSource")
	@Profile("prod")
	public DataSource getProdDataSource() {
		returnnew ProductionDatabaseUtil();
	  }
}
As we discussed if we don’t use @Bean’s name attribute, Spring IOC Container uses method name to generate bean id. However here we are using different method names, but we are defining name=”dataSource” attribute for both methods. In this scenario, Spring container use name attribute value to generate bean id.
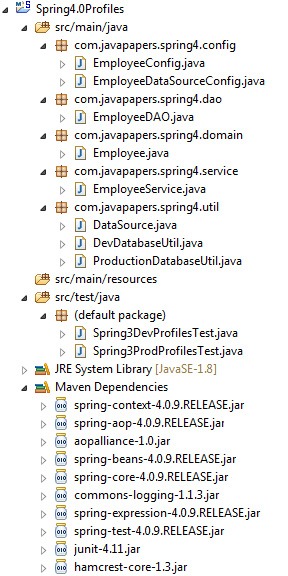
Remaining all components are same as in Spring 3.2 profiles example application. Now the Spring 4.0 Profiles example application looks as below,

Download example application project Spring4.0Profiles
Comments on "@Profile Annotation Improvements in Spring 4"
Comments are closed for "@Profile Annotation Improvements in Spring 4".


Very nice and fantastic example for Spring Profiles. It helped me a lot to update my project with profiles.
Thanks JavaPapers.
[…] go through “Spring @Profile Annotation” topic to get knowledge on Spring’s Java-based Configuration and Spring […]
excellent explanation…..simply superb,,,,,