Introduction to Kotlin
1. Overview
This lesson will introduce you to the world of Kotlin, a new programming language by JetBrains which is now officially, a first-class citizen for Android.

This means that you are free to develop Android apps in Kotlin as well. Apart from Android, you can always use Kotlin in Server-side applications as well, like with Spring Boot development. Let’s look at this wonderful language to start our journey.
Note that this lesson is not meant as an introduction to programming, so, familiarity with some programming constructs is expected.
2. Maven Dependencies
To demonstrate the Android examples in this lesson, we will make a Maven based project and start adding relevant examples.
For Kotlin support, we need to add a single dependency in pom.xml file:
<dependencies>
  <dependency>
    <groupId>org.jetbrains.kotlin</groupId>
    <artifactId>kotlin-stdlib</artifactId>
    <version>1.1.51</version>
  </dependency>
</dependencies>
Apart from this dependency, Kotlin maven plugin is needed as well to build a Kotlin project. Following is the needed plugin:
<build>
  <sourceDirectory>${project.basedir}/src/main/kotlin</sourceDirectory>
  <testSourceDirectory>${project.basedir}/src/test/kotlin</testSourceDirectory>
  <plugins>
    <plugin>
      <artifactId>kotlin-maven-plugin</artifactId>
        <groupId>org.jetbrains.kotlin</groupId>
        <version>1.1.51</version>
        <executions>
          <execution>
            <id>compile</id>
              <goals>
                <goal>compile</goal>
              </goals>
          </execution>
          <execution>
            <id>test-compile</id>
            <goals>
              <goal>test-compile</goal>
            </goals>
          </execution>
        </executions>
      </plugin>
  </plugins>
</build>
3. Getting Started
Now, for a tradition, we will start our lesson with a famous ‘Hello World’ program.
3.1. Hello World
In Kotlin, functions are a first-class citizen. This means that a function can exist without a class! Yes, that’s correct.
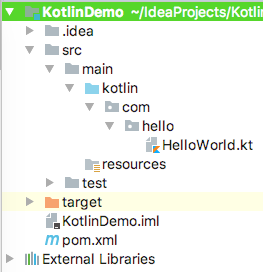
Let’s create a package com.hello and create a new file as HelloWorld.kt in it. Currently, my project structure looks like:
Now, let us create a simple program which will print “Hello World!” to the screen:
package com.hello

fun main(args: Array<String>) {
    println("Hello World!")
}
As expected, a Kotlin program starts with a package statement which informs the compiler about the package this file should be scoped to.
Next, we create a function and call it main(…). Existing Java Developers will find this extremely similar to Java because it actually is. main(…) is the first function which is called when a Kotlin project is run.
Go ahead and run this program and we’ll see the magical message for “Hello World!”.
3.2. Creating Variables
In Kotlin, Variables can be defined in many ways.
To create final variables, also termed as constants, use the val keyword:
val myAge = 21
val myLanguage = "Kotlin"
Now, clearly, the data-type of the variables was not mentioned here. This was because Kotlin can interpret the data type of a variable from the initial value it is provided. So, myAge final variable is of type int and myLanguage is of type String.
To create variables with no initial value, we can use the var keyword:
var myName: String? = null
var loveKotlin: Boolean? = null
Notice closely how we made use of the var keyword along with the Datatype and a ‘?’. In Kotlin, whenever we need to define a variable with no initial value, we need to use the ‘?’ operator with the Datatype for Null-check. We will read this in detail in a later section.
3.3. String Operations
Kotlin provides an excellent way of performing String related operations. Let’s see some examples to support the claim.
Printing a String variable is easy:
fun main(args: Array<String>) {
    println(myLanguage)
}
Formatting String is even easier:
fun main(args: Array<String>) {
    println("I love $myLanguage")
}
The $ symbol formats the String and the expression is evaluated before the actual print call. This will print the message “I love Kotlin”.
val firstName = "Java"
val lastName = "Papers"
print("My name is $firstName $lastName")
Above print statement will print “My name is Java Papers”. So, we can format multiple String parameters in a single expression as well.
Also, note that no semi-colon is needed after each statement in Kotlin. The newline character is treated as the end of a statement.
3.4. Conditional Statements: If statements
Just like in Java, use of if is defined with conditions. To make things fluent, if can also behave as a function:
fun ifCheck(studentId: String) {
  val studentName = if(studentId == "100") "Joseph" else "Jane"
  print(studentName)
}
In above code snippet, studentName will be assigned a value based on the value of studentId. Note that we just compared Strings using ‘==’ operator. We can do this in Kotlin. Though it is obvious, using if statement normally is possible as well:
fun ifCheck(studentId: String) {
  val studentName: String?

  if(studentId == "100") {
    studentName = "Joseph"
  } else {
    studentName = "Jane"
  }
}
Even more interesting than if statement, Kotlin has an excellent when statement for easier evaluation. Let’s see it in action:
fun whenCheck() {
  val studentName: String?

  val studentId = "100"
  when (studentId) {
    "100" -> studentName = "Joseph"
    "101" -> studentName = "Jane"
  }
}
3.5. Working with Loops
Looping in Kotlin is very simple because the construct feels like plain English. Let’s see how this works:
fun forCheck() {
  val items = arrayOf("lion", "tiger", "crocodile", "elephant")

  for (item in items) {
    println(item)
  }

  for(i in 1..10 step 1) {
    println(i)
  }
}
In above code snippet, we used two different ways of using for loops. In the first example, we just used for-in construct of the loop. Next one was a little complicated.
The second example made an array of numbers from 1 to 10 internally and looped over it.
3.6. Classes
Making a class in Kotlin is very similar to Java. Let’s see an example:
class Student {

    var id: Long? = null
    var name: String? = null
    var percentage: Double? = null
    var age: Int? = null
}
That’s easy. But wait, where are those getters and setters? With Kotlin, we don’t need them as those are managed by Kotlin internally itself.
If a model is made just for the sake of holding data, like above class Student, it should be made as a data class. Data classes have just one purpose, to hold data. Let’s transform above class to a data class:
data class Student(var id: Long?,
                   var name: String?,
                   var percentage: Double? = 0.0,
                   var age: Int?)
Look how we modified the class to a single line declaration. With this, even the curly braces are not needed. If an object is needed for Student, it can be made as:
Student(id = 1, name = "John", age = 21)
See how we didn’t provide any value for the percentage as that was done in the constructor itself.
4. Conclusion
To start, that was an excellent introduction to Kotlin. Go on and try more examples with Kotlin and its constructs.
Comments on "Introduction to Kotlin"
Comments are closed for "Introduction to Kotlin".


Very good introduction to Kotlin :)
Best explanation to kick start kotlin .
Informative and easy to get!
this easy to get the information
good job
But
my one question how to create twitter ingration
easy step please provide the idea