Android Todo List Application Tutorial
This Android tutorial is to walk you through to create a todo list Android application. We will be using the Android SQLLite database to store and retrieve the todo list items.
A recent web application and its mobile application that I liked very much is Google Inbox. It is certainly worth a mention in a todo list tutorial. Google has converted the Email into a whole big todo list with cool features. I liked the way they have envisioned it and certainly helps me to prioritize and execute.

In this tutorial, we will see how to build a basic trimmed down todo list Android application and you can build on top of it and make it usable.
Todo List Application
Following is the AndroidManifest.xml and its just straight forward.
<?xml version="1.0" encoding="utf-8"?>
<manifest xmlns:android="http://schemas.android.com/apk/res/android"
    package="com.javapapers.androidtodo" >

    <application
        android:allowBackup="true"
        android:icon="@drawable/ic_launcher"
        android:label="@string/app_name"
        android:theme="@style/AppTheme" >
        <activity
            android:name=".TodoActivity"
            android:label="@string/app_name" >
            <intent-filter>
                <action android:name="android.intent.action.MAIN" />

                <category android:name="android.intent.category.LAUNCHER" />
            </intent-filter>
        </activity>
    </application>

</manifest>
Todo List Layout
We are using a ListView to display the todo list items. We have seen about displaying list items in a previous Android ListView tutorial.
activity_todo.xml
<?xml version="1.0" encoding="utf-8"?>
<LinearLayout xmlns:android="http://schemas.android.com/apk/res/android"
    android:orientation="vertical"
    android:layout_width="fill_parent"
    android:layout_height="fill_parent">

    <ListView
        android:layout_width="match_parent"
        android:layout_height="match_parent"
        android:id="@android:id/list"
        android:layout_weight="1"
        android:layout_margin="10dp" />

</LinearLayout>
todotask.xml
<?xml version="1.0" encoding="utf-8"?>

<RelativeLayout
    android:layout_width="fill_parent"
    android:layout_height="fill_parent"
    xmlns:android="http://schemas.android.com/apk/res/android">

    <TextView
        android:layout_width="wrap_content"
        android:layout_height="fill_parent"
        android:id="@+id/todoTaskTV"
        android:layout_alignParentTop="true"
        android:layout_alignParentLeft="true"
        android:layout_alignParentStart="true"
        android:layout_toLeftOf="@+id/completeBtn"
        android:layout_alignBottom="@+id/completeBtn"
        android:gravity="center_vertical"
        android:paddingTop="20dp" />

    <Button
        android:layout_width="wrap_content"
        android:layout_height="wrap_content"
        android:text="Complete"
        android:id="@+id/completeBtn"
        android:layout_alignParentTop="true"
        android:layout_alignParentRight="true"
        android:layout_alignParentEnd="true"
        android:onClick="onDoneButtonClick" />
</RelativeLayout>
Todo List Activity
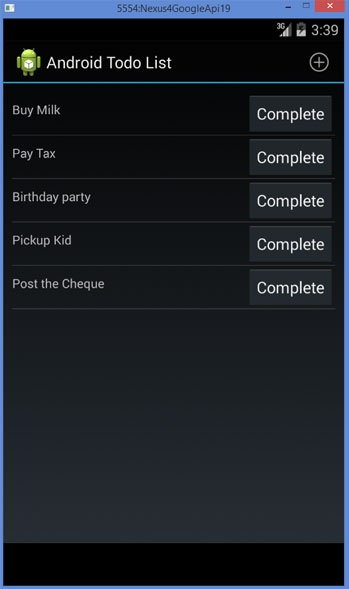
Following is the main and only Android Activity used for this example todo application. We display the todo list items with each item having a TextView and Button. TextView is to show the todo item and Button is to close / delete the same.
TodoActivity.java
package com.javapapers.androidtodo;

import android.app.AlertDialog;
import android.app.ListActivity;
import android.content.ContentValues;
import android.content.DialogInterface;
import android.database.Cursor;
import android.database.sqlite.SQLiteDatabase;
import android.os.Bundle;
import android.view.Menu;
import android.view.MenuItem;
import android.view.View;
import android.widget.EditText;
import android.widget.ListAdapter;
import android.widget.SimpleCursorAdapter;
import android.widget.TextView;

public class TodoActivity extends ListActivity {
    private ListAdapter todoListAdapter;
    private TodoListSQLHelper todoListSQLHelper;

    @Override
    public void onCreate(Bundle savedInstanceState) {
        super.onCreate(savedInstanceState);
        setContentView(R.layout.activity_todo);
        updateTodoList();
    }

    @Override
    public boolean onCreateOptionsMenu(Menu menu) {
        getMenuInflater().inflate(R.menu.todo, menu);
        return true;
    }

    @Override
    public boolean onOptionsItemSelected(MenuItem item) {
        switch (item.getItemId()) {
            case R.id.action_add_task:
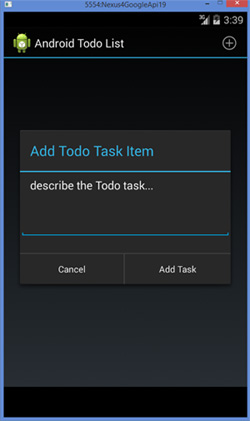
                AlertDialog.Builder todoTaskBuilder = new AlertDialog.Builder(this);
                todoTaskBuilder.setTitle("Add Todo Task Item");
                todoTaskBuilder.setMessage("describe the Todo task...");
                final EditText todoET = new EditText(this);
                todoTaskBuilder.setView(todoET);
                todoTaskBuilder.setPositiveButton("Add Task", new DialogInterface.OnClickListener() {
                    @Override
                    public void onClick(DialogInterface dialogInterface, int i) {
                        String todoTaskInput = todoET.getText().toString();
                        todoListSQLHelper = new TodoListSQLHelper(TodoActivity.this);
                        SQLiteDatabase sqLiteDatabase = todoListSQLHelper.getWritableDatabase();
                        ContentValues values = new ContentValues();
                        values.clear();

                        //write the Todo task input into database table
                        values.put(TodoListSQLHelper.COL1_TASK, todoTaskInput);
                        sqLiteDatabase.insertWithOnConflict(TodoListSQLHelper.TABLE_NAME, null, values, SQLiteDatabase.CONFLICT_IGNORE);

                        //update the Todo task list UI
                        updateTodoList();
                    }
                });

                todoTaskBuilder.setNegativeButton("Cancel", null);

                todoTaskBuilder.create().show();
                return true;

            default:
                return false;
        }
    }

    //update the todo task list UI
    private void updateTodoList() {
        todoListSQLHelper = new TodoListSQLHelper(TodoActivity.this);
        SQLiteDatabase sqLiteDatabase = todoListSQLHelper.getReadableDatabase();

        //cursor to read todo task list from database
        Cursor cursor = sqLiteDatabase.query(TodoListSQLHelper.TABLE_NAME,
                new String[]{TodoListSQLHelper._ID, TodoListSQLHelper.COL1_TASK},
                null, null, null, null, null);

        //binds the todo task list with the UI
        todoListAdapter = new SimpleCursorAdapter(
                this,
                R.layout.todotask,
                cursor,
                new String[]{TodoListSQLHelper.COL1_TASK},
                new int[]{R.id.todoTaskTV},
                0
        );

        this.setListAdapter(todoListAdapter);
    }

    //closing the todo task item
    public void onDoneButtonClick(View view) {
        View v = (View) view.getParent();
        TextView todoTV = (TextView) v.findViewById(R.id.todoTaskTV);
        String todoTaskItem = todoTV.getText().toString();

        String deleteTodoItemSql = "DELETE FROM " + TodoListSQLHelper.TABLE_NAME +
                " WHERE " + TodoListSQLHelper.COL1_TASK + " = '" + todoTaskItem + "'";

        todoListSQLHelper = new TodoListSQLHelper(TodoActivity.this);
        SQLiteDatabase sqlDB = todoListSQLHelper.getWritableDatabase();
        sqlDB.execSQL(deleteTodoItemSql);
        updateTodoList();
    }
}
TodoListSQLHelper.java
This class is a SQLiteOpenHelper and just forks the embedded SQLite database. To know more about handling the SQLite database in Android refer the earlier written Android SQLite Database tutorial.
package com.javapapers.androidtodo;

import android.content.Context;
import android.database.sqlite.SQLiteDatabase;
import android.database.sqlite.SQLiteOpenHelper;
import android.provider.BaseColumns;

public class TodoListSQLHelper extends SQLiteOpenHelper {

    public static final String DB_NAME = "com.javapapers.androidtodo";
    public static final String TABLE_NAME = "TODO_LIST";
    public static final String COL1_TASK = "todo";
    public static final String _ID = BaseColumns._ID;

    public TodoListSQLHelper(Context context) {
        //1 is todo list database version
        super(context, DB_NAME, null, 1);
    }

    @Override
    public void onCreate(SQLiteDatabase sqlDB) {
        String createTodoListTable = "CREATE TABLE " + TABLE_NAME + " ( _id INTEGER PRIMARY KEY AUTOINCREMENT, " +
                COL1_TASK + " TEXT)";
        sqlDB.execSQL(createTodoListTable);
    }

    @Override
    public void onUpgrade(SQLiteDatabase sqlDB, int i, int i2) {
        sqlDB.execSQL("DROP TABLE IF EXISTS " + TABLE_NAME);
        onCreate(sqlDB);
    }
}

Comments on "Android Todo List Application Tutorial"
Comments are closed for "Android Todo List Application Tutorial".


Yaw yaw yaw, you forgot to add a menu XML file. You have also mentioned in the code getMenuInflater().inflate(R.menu.todo, menu); and in the switch case R.id.add_action_task. Where did yaw mention dem in da KODE ?
Hello, thank you for the tutorial.
Your onDoneButtonClick method doesn’t appear to delete the row, why is that?
I’ve tried it but all the application does is crash when the button is pressed.
Never mind. I figured it out. SQLite demands that all of the Strings be in all capital letters.
When i try to build your project, I get an error showing android manifest not found. I can view the file alright. But it doesnt build.
good