Android ListView Custom Layout Tutorial
In this Android tutorial, lets learn about using a custom layout in a ListView. We can design a separate layout and use it as the layout for a row in the list view.
In the previous Android tutorial for ListView we saw the basics. There we used a layout available as part of the Android and it is fine for a simple list of items. When we want to have a list displayed with specific requirements we have to come up with our own layout.

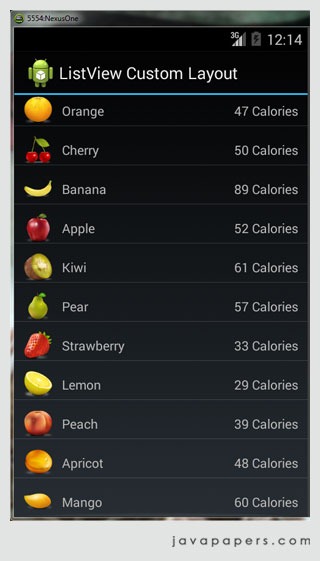
In the below example app, we will display a list with three columns. It is to list a set of fruits with their caloric information. The first column is to show the image followed by the fruit name and finally the caloric value.
ArrayAdapter
We will use a custom ArrayAdapter to manage the data for the ListView. We will use the view holder patter for better list performance.
package com.javapapers.android.listviewcustomlayout.app;

import android.content.Context;
import android.graphics.Bitmap;
import android.graphics.BitmapFactory;
import android.view.LayoutInflater;
import android.view.View;
import android.view.ViewGroup;
import android.widget.ArrayAdapter;
import android.widget.ImageView;
import android.widget.TextView;

import java.util.ArrayList;
import java.util.List;

public class FruitArrayAdapter extends ArrayAdapter<Fruit> {
    private static final String TAG = "FruitArrayAdapter";
	private List<Fruit> fruitList = new ArrayList<Fruit>();

    static class FruitViewHolder {
        ImageView fruitImg;
        TextView fruitName;
        TextView calories;
    }

    public FruitArrayAdapter(Context context, int textViewResourceId) {
        super(context, textViewResourceId);
    }

	@Override
	public void add(Fruit object) {
		fruitList.add(object);
		super.add(object);
	}

    @Override
	public int getCount() {
		return this.fruitList.size();
	}

    @Override
	public Fruit getItem(int index) {
		return this.fruitList.get(index);
	}

    @Override
	public View getView(int position, View convertView, ViewGroup parent) {
		View row = convertView;
        FruitViewHolder viewHolder;
		if (row == null) {
			LayoutInflater inflater = (LayoutInflater) this.getContext().getSystemService(Context.LAYOUT_INFLATER_SERVICE);
			row = inflater.inflate(R.layout.listview_row_layout, parent, false);
            viewHolder = new FruitViewHolder();
            viewHolder.fruitImg = (ImageView) row.findViewById(R.id.fruitImg);
            viewHolder.fruitName = (TextView) row.findViewById(R.id.fruitName);
            viewHolder.calories = (TextView) row.findViewById(R.id.calories);
            row.setTag(viewHolder);
		} else {
            viewHolder = (FruitViewHolder)row.getTag();
        }
		Fruit fruit = getItem(position);
        viewHolder.fruitImg.setImageResource(fruit.getFruitImg());
        viewHolder.fruitName.setText(fruit.getFruitName());
        viewHolder.calories.setText(fruit.getCalories());
		return row;
	}

    public Bitmap decodeToBitmap(byte[] decodedByte) {
		return BitmapFactory.decodeByteArray(decodedByte, 0, decodedByte.length);
	}
}
ListView Activity
In the activity, we will load the adapter with data and bind it with the ListView layout. For each of the row, we will bind the custom layout we have designed separately.
package com.javapapers.android.listviewcustomlayout.app;

import android.app.Activity;
import android.os.Bundle;
import android.widget.ListView;

import java.util.ArrayList;
import java.util.List;

public class ListViewActivity extends Activity {
    private static final String TAG = "ListViewActivity";

    private FruitArrayAdapter fruitArrayAdapter;
	private ListView listView;

	private static int colorIndex;

	@Override
	public void onCreate(Bundle savedInstanceState) {
		super.onCreate(savedInstanceState);
		setContentView(R.layout.listview_layout);
        colorIndex = 0;
		listView = (ListView) findViewById(R.id.listView);
		fruitArrayAdapter = new FruitArrayAdapter(getApplicationContext(), R.layout.listview_row_layout);
		listView.setAdapter(fruitArrayAdapter);

        List<String[]> fruitList = readData();
        for(String[] fruitData:fruitList ) {
            String fruitImg = fruitData[0];
            String fruitName = fruitData[1];
            String calories = fruitData[2];
            int fruitImgResId = getResources().getIdentifier(fruitImg, "drawable", "com.javapapers.android.listviewcustomlayout.app");

            Fruit fruit = new Fruit(fruitImgResId,fruitName,calories);
            fruitArrayAdapter.add(fruit);
        }
	}

    public List<String[]> readData(){
        List<String[]> resultList = new ArrayList<String[]>();

        String[] fruit7 = new String[3];
        fruit7[0] = "orange";
        fruit7[1] = "Orange";
        fruit7[2] = "47 Calories";
        resultList.add(fruit7);

        String[] fruit1 = new String[3];
        fruit1[0] = "cherry";
        fruit1[1] = "Cherry";
        fruit1[2] = "50 Calories";
        resultList.add(fruit1);


        String[] fruit3 = new String[3];
        fruit3[0] = "banana";
        fruit3[1] = "Banana";
        fruit3[2] = "89 Calories";
        resultList.add(fruit3);

        String[] fruit4 = new String[3];
        fruit4[0] = "apple";
        fruit4[1] = "Apple";
        fruit4[2] = "52 Calories";
        resultList.add(fruit4);

        String[] fruit10 = new String[3];
        fruit10[0] = "kiwi";
        fruit10[1] = "Kiwi";
        fruit10[2] = "61 Calories";
        resultList.add(fruit10);

        String[] fruit5 = new String[3];
        fruit5[0] = "pear";
        fruit5[1] = "Pear";
        fruit5[2] = "57 Calories";
        resultList.add(fruit5);


        String[] fruit2 = new String[3];
        fruit2[0] = "strawberry";
        fruit2[1] = "Strawberry";
        fruit2[2] = "33 Calories";
        resultList.add(fruit2);

        String[] fruit6 = new String[3];
        fruit6[0] = "lemon";
        fruit6[1] = "Lemon";
        fruit6[2] = "29 Calories";
        resultList.add(fruit6);

        String[] fruit8 = new String[3];
        fruit8[0] = "peach";
        fruit8[1] = "Peach";
        fruit8[2] = "39 Calories";
        resultList.add(fruit8);

        String[] fruit9 = new String[3];
        fruit9[0] = "apricot";
        fruit9[1] = "Apricot";
        fruit9[2] = "48 Calories";
        resultList.add(fruit9);

        String[] fruit11 = new String[3];
        fruit11[0] = "mango";
        fruit11[1] = "Mango";
        fruit11[2] = "60 Calories";
        resultList.add(fruit11);

        return  resultList;
    }

}
ListView Layout XML
<RelativeLayout xmlns:android="http://schemas.android.com/apk/res/android"
    android:layout_width="fill_parent"
    android:layout_height="match_parent"
    android:orientation="vertical">

    <ListView xmlns:android="http://schemas.android.com/apk/res/android"
        android:id="@+id/listView"
        android:layout_width="match_parent"
        android:layout_height="match_parent"
        android:layout_marginBottom="0dp"
        android:layout_marginTop="0dp"
/>

</RelativeLayout>
Custom Layout for Row in ListView
<?xml version="1.0" encoding="utf-8"?>
<RelativeLayout xmlns:android="http://schemas.android.com/apk/res/android"
    android:layout_width="fill_parent"
    android:layout_height="fill_parent"
    android:layout_marginBottom="0dp"
    android:layout_marginTop="0dp"
    android:focusableInTouchMode="true">

    <ImageView
        android:id="@+id/fruitImg"
        android:layout_width="wrap_content"
        android:layout_height="wrap_content"
        android:layout_centerVertical="true"
        android:paddingRight="10dp"
        android:paddingTop="10dp"
        android:paddingLeft="10dp"
        android:scaleType="centerCrop" />

    <TextView
        android:id="@+id/fruitName"
        android:layout_width="wrap_content"
        android:layout_height="wrap_content"
        android:layout_toRightOf="@+id/fruitImg"
        android:layout_centerVertical="true"
        android:paddingTop="10dp"
        android:text="Cherry"/>

    <TextView
        android:id="@+id/calories"
        android:layout_width="wrap_content"
        android:layout_height="wrap_content"
        android:layout_alignParentRight="true"
        android:layout_centerVertical="true"
        android:paddingTop="10dp"
        android:paddingRight="10dp"/>
</RelativeLayout>
Download the complete source of this example Android application ListView Custom Layout
Comments on "Android ListView Custom Layout Tutorial"
Comments are closed for "Android ListView Custom Layout Tutorial".


Thanks for explaining the purpose of adapter how it can be implemented in listview (specifically BaseAdapter and ArrayAdapter).
[…] at this example Android application where we have used a CSV file to load data. We have used the Android custom list view layout to load and display the data from CSV file. We have seen how to use the custom list view layout in […]
[…] seen in the “Android ListView Custom Layout Tutorial” we can use a type of array adapter to control the data displayed in the expandable list view. We […]