Using Database from an Android Application
This tutorial is to use a database from an android application. I have used MySQL database for example. This tutorial can be broadly classified into two major steps.
1. Creating server side code for performing CRUD operations.
2. Creating Android application and let it access database via server side code.
1. Creating server side code for performing CRUD operations.
This step is our usual stuff. We have an application server running and we deploy server side code in it with capabilities to access a database. We have the regular database operations Create, Read, Update and Delete in this server side application. We know how to do a basic web application using java jdbc and deploy it in server. So just for a change, here I have used PHP :-)
config.php
This file is to just hold the configuration parameters which is imported in main file.
<?php
// database settings
define('HOST',"#Your Host name here#");
define('USERNAME',"#Username#");
define('PASSWORD',"#Password#");
define('DATABASE_NAME',"zoo");
?>
Creating New Row Using PHP
add_animals.php
<?php
require_once("config.php");
$conn = mysql_connect(HOST,USERNAME,PASSWORD);
mysql_select_db(DATABASE_NAME,$conn);

$server_response = array();
$current_id = addAnimal();
if($current_id) {
$server_response["success"] = 1;
echo json_encode($server_response);
}
function addAnimal() {
$query = "insert into animals (animal_name,animal_type) values ('" . $_POST["animal_name"] . "','" . $_POST["animal_type"] . "')";
$result = mysql_query($query);
if (!$result) {
die('Invalid query: ' . mysql_error());
}
return mysql_insert_id();
}
?>
The method mysql_connect is used to connect the host with the constant values defined in the config file.
$conn = mysql_connect(HOST,USERNAME,PASSWORD);
And then, the mysql_select_db method is used to select the database and it is used as,
mysql_select_db(DATABASE_NAME,$conn);
After completing the db connect operations, the addAnimal method forms insert query with the values posted by the user from Android application. After successful insert, a server response will be created by json_encode method.
Read List of Rows from Database
list_animals.php
<?php
require_once("config.php");
$conn = mysql_connect(HOST,USERNAME,PASSWORD);
mysql_select_db(DATABASE_NAME,$conn);

$server_response = array();
$animals = getAnimals();
if(is_array($animals)) {
$server_response["animals"] = $animals;
$server_response["success"] = 1;
echo json_encode($server_response);
}
function getAnimals() {
$query  =  "select * from animals";
$result = mysql_query($query);
if (!$result) {
die('Invalid query: ' . mysql_error());
}
while($row=mysql_fetch_array($result)) {
$animalslist[] = $row;
}
return $animalslist;
}
?>
Here the getAnimals method is used to create a list of animals stored in database. This will be performed by the php in-built function mysql_fetch_array. This function will be called inside a while loop till the end of record is reached. And then the server response will be created by the set of animals and a success flag.
2. Creating Android application and let it access database via server side code.
For creating a basic template app, refer my previous Android hello world tutorial.
In this step we need to provide input domain for user to send their request for performing the database operations. The application given for an example is working for adding a new animal into zoo database and for retrieving the list of animals stored. For that, there is a need for creating three Android Activity.
- HomeActivity
- ListAnimalActivity
- AddAnimalActivity
HomeActivity
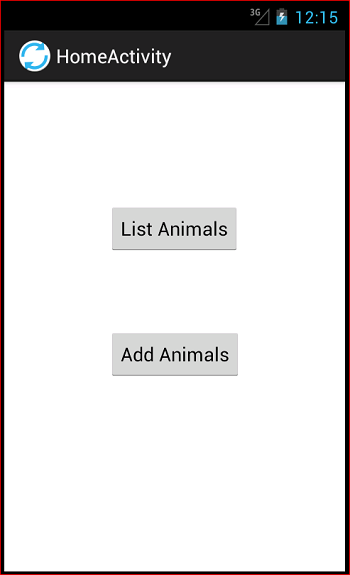
In this activity there are two buttons in the design view labeled as List Animal and Add Animal. The xml file corresponding to the design is shown below.

activity_home.xml
<RelativeLayout xmlns:android="http://schemas.android.com/apk/res/android"
xmlns:tools="http://schemas.android.com/tools"
android:layout_width="match_parent"
android:layout_height="match_parent"
android:onClick="startViewTasksActivity" >

<Button
android:id="@+id/button1"
android:layout_width="wrap_content"
android:layout_height="wrap_content"
android:layout_alignParentTop="true"
android:layout_centerHorizontal="true"
android:layout_marginTop="114dp"
android:onClick="startListAnimalActivity"
android:text="List Animals" />

<Button
android:id="@+id/button2"
android:layout_width="wrap_content"
android:layout_height="wrap_content"
android:layout_alignLeft="@+id/button1"
android:layout_below="@+id/button1"
android:layout_marginTop="70dp"
android:onClick="startAddAnimalActivity"
android:text="Add Animals" />

</RelativeLayout>
Oncliking List Animal button the ListAnimalActivity will be started and similarly the AddAnimalActivity will be started with the other button. This start event will be called based on the corresponding value placed on the onclick properties of these button.
These event handlers should be defined with a java class named HomeActivity which extends Activity class. Inside the definition the instance of intent class will be created to start corresponding activity. The code is shown as follows.
HomeActivity.java
package com.javapapers.android.databaseaccess;

import android.os.Bundle;
import android.app.Activity;
import android.content.Intent;
import android.view.View;

public class HomeActivity extends Activity {

@Override
public void onCreate(Bundle savedInstanceState) {
super.onCreate(savedInstanceState);
setContentView(R.layout.activity_home);
}

public void startListAnimalActivity(View view) {
Intent objIndent = new Intent(getApplicationContext(), ListAnimalActivity.class);
startActivity(objIndent);
}

public void startAddAnimalActivity(View view) {
Intent objIndent = new Intent(getApplicationContext(), AddAnimalActivity.class);
startActivity(objIndent);
}
}
ListAnimalActivity
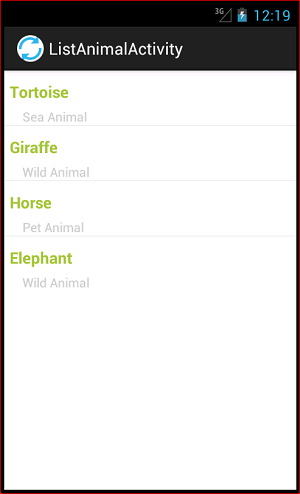
In this step there is one list view to display the entire list of animals. For each entry of this list contains the details like animal name and animal type. So the corresponding TextViews are created in separate xml file named view_animal_entry.xml. These two files are like as follows.
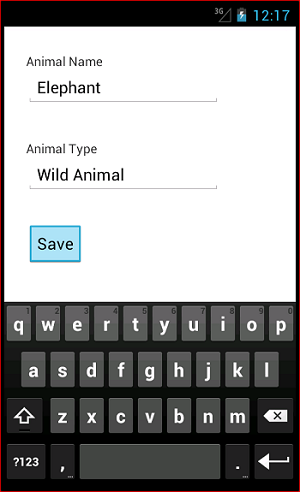
Add animal goes like,

List animal looks like,

activity_list_animal.xml
<RelativeLayout xmlns:android="http://schemas.android.com/apk/res/android"
xmlns:tools="http://schemas.android.com/tools"
android:layout_width="match_parent"
android:layout_height="match_parent" >

<ListView
android:id="@android:id/list"
android:layout_width="match_parent"
android:layout_height="wrap_content"
android:layout_alignParentLeft="true"
android:layout_alignParentTop="true" >
</ListView>

</RelativeLayout>
This file has the ListView control with the id @android:id/list. Ensure the id of this conrol as specified which is used for creating the instance for ListAdapter class while writing code logic.
This file will be created automatically on creating ListAnimalActivity if you are using Eclipse. But the following xml file should be created explicitly. This file has the animal details. The animal id visibility will be none. It is used for viewing or updating purpose in future.
<?xml version="1.0" encoding="utf-8"?>
<LinearLayout xmlns:android="http://schemas.android.com/apk/res/android"
android:layout_width="fill_parent"
android:layout_height="wrap_content"
android:orientation="vertical" >

<TextView
android:id="@+id/animal_id"
android:layout_width="fill_parent"
android:layout_height="wrap_content"
android:visibility="gone" />

<TextView
android:id="@+id/animal_name"
android:layout_width="fill_parent"
android:layout_height="wrap_content"
android:layout_marginBottom="5dp"
android:layout_marginTop="5dp"
android:paddingLeft="6dip"
android:paddingTop="6dip"
android:textColor="#A4C739"
android:textSize="17dip"
android:textStyle="bold" />

<TextView
android:id="@+id/animal_type"
android:layout_width="wrap_content"
android:layout_height="wrap_content"
android:layout_marginLeft="20dp"
android:text="Small Text"
android:textAppearance="?android:attr/textAppearanceSmall"
android:textColor="#CCCCCC" />

</LinearLayout>
The ListAnimalActivity class is created for writing logic for this activity. This class extends ListActivity where as most classes used to extend the Activity class.
First step is creating ArrayList of HashMap where the element of arrays are stored as a key value pair.
ArrayList
Next the instance ProgressDialog is created to set message to be displayed where the application’s request is in progress.
private ProgressDialog progressMessage;
This is done with the onPreExecute method, that will be called while the read request is sent to the server. This Dialog will exist until the arraylist of elements from database is retrieved.
@Override
protected void onPreExecute() {
super.onPreExecute();
progressMessage = new ProgressDialog(ListAnimalActivity.this);
progressMessage.setMessage("Loading ...");
progressMessage.setIndeterminate(false);
progressMessage.setCancelable(false);
progressMessage.show();
}
Then the object is created for JSONParser class. This object is used to make a Http Request to the server to run the required url. While running this php file it will return the json response by the method json_encode which is given above.
JSONParser jParser = new JSONParser(); private static String url = "http://www.ventusindia.com/zoo/list_animals.php"; ... ... ... Listparams = new ArrayList (); JSONObject json = jParser.makeHttpRequest(url, "GET", params);
This response comprises with the array of elements retrieved from animal table of our zoo database. For each iteration of this array, the json object read the value of the attribuites which are animal_id, animal_name, animal_type. And then, this values are put into the map with the pairs of key and value. This map then added to the animalList which is the ArrayList of HashMap declared initially.
animals = json.getJSONArray("animals");
for (int i = 0; i < animals.length(); i++) {
JSONObject c = animals.getJSONObject(i);
String id = c.getString("animal_id");
String name = c.getString("animal_name");
String type = c.getString("animal_type");
HashMap map = new HashMap();
map.put("animal_id", id);
map.put("animal_name", name);
map.put("animal_type", type);
animalList.add(map);
}
After the background functionalities are over, then the onPostExecute method will be invoked.
progressMessage.dismiss();
First it stops the ProgressDialog. And then, a adapter will be created with the arguments like,
- current Activity class – ListAnimalActivity.class
- Arraylist – Arraylist of HashMap as animalList to store the animal details as key,value pair
- layout – xml file used for creating each entry of animal table
- The name of the attribuite stored in the Arraylist – animal_id,animal_name,animal_type
- TextView references – The id of TextView widget in view_animal_entry.xml
ListAdapter adapter = new SimpleAdapter(
ListAnimalActivity.this, animalList,
R.layout.view_animal_entry, new String[] { "animal_id","animal_name","animal_type"},
new int[] { R.id.animal_id, R.id.animal_name,R.id.animal_type });
And finally, this will be set by the method setListAdapter having adapter instance as its arguments.
setListAdapter(adapter);
So, the complete code for ListAnimalActvity class will be as follows.
ListAnimalActivity.java
package com.javapapers.android.databaseaccess;

import java.util.ArrayList;
import java.util.HashMap;
import java.util.List;

import org.apache.http.NameValuePair;
import org.json.JSONArray;
import org.json.JSONException;
import org.json.JSONObject;

import android.app.ListActivity;
import android.app.ProgressDialog;
import android.os.AsyncTask;
import android.os.Bundle;
import android.util.Log;
import android.widget.ListAdapter;
import android.widget.SimpleAdapter;

public class ListAnimalActivity extends ListActivity  {
ArrayList> animalList;
private ProgressDialog progressMessage;
JSONParser jParser = new JSONParser();
private static String url = "http://www.ventusindia.com/zoo/list_animals.php";
JSONArray animals = null;
@Override
public void onCreate(Bundle savedInstanceState) {
super.onCreate(savedInstanceState);
setContentView(R.layout.activity_list_animal);
animalList = new ArrayList>();
new LoadAllProducts().execute();
}

class LoadAllProducts extends AsyncTask {

@Override
protected void onPreExecute() {
super.onPreExecute();
progressMessage = new ProgressDialog(ListAnimalActivity.this);
progressMessage.setMessage("Loading ...");
progressMessage.setIndeterminate(false);
progressMessage.setCancelable(false);
progressMessage.show();
}

protected String doInBackground(String... args) {
List params = new ArrayList();
JSONObject json = jParser.makeHttpRequest(url, "GET", params);

Log.d("Animals: ", json.toString());

try {
int success = json.getInt("success");

if (success == 1) {
animals = json.getJSONArray("animals");
for (int i = 0; i < animals.length(); i++) {
JSONObject c = animals.getJSONObject(i);
String id = c.getString("animal_id");
String name = c.getString("animal_name");
String type = c.getString("animal_type");
HashMap map = new HashMap();
map.put("animal_id", id);
map.put("animal_name", name);
map.put("animal_type", type);
animalList.add(map);
}
}
} catch (JSONException e) {
e.printStackTrace();
}

return null;
}
protected void onPostExecute(String file_url) {
progressMessage.dismiss();
runOnUiThread(new Runnable() {
public void run() {
ListAdapter adapter = new SimpleAdapter(
ListAnimalActivity.this, animalList,
R.layout.view_animal_entry, new String[] { "animal_id",
"animal_name","animal_type"},
new int[] { R.id.animal_id, R.id.animal_name,R.id.animal_type });
setListAdapter(adapter);
}
});

}

}
}
Comments on "Using Database from an Android Application"
Comments are closed for "Using Database from an Android Application".


hey nice one.
your android tutorial are really helping
Every time you come up with new ideas. these are so helpful to me at learning stage. thank you…
Very nice.. Thank u.. :)
What a wonderful post sir…
Nice post Joe.
tnx
Thanks
thanks good examples
hello,sir will you plz tell me how to create a login app using php mysql connectivity from android
really very very nice…
good work..
Without using PHP script can connect to database in android (That means using JSP) If can mean how please guide me….(I am new for android Development)
Hy I am absolute noob in Android and PHP, and this example was everything I need to my school project. But I dont understand one thing, there is error in this line:
Intent objIndent = new Intent(getApplicationContext(), AddAnimalActivity.class);
startActivity(objIndent);
U havent wrote that addanimalactivity.class, but u have wrote ListAnimalActivity.class
I dont understand it… Pls help me…
Thx a lot for this amazing code but it still have one problem,what shall i write in the jsonparser class. Thank you
dear can you mail me the source code this proj including php files
thanks advce
Very nice…
Please provide source code as downloadable
Where is addanimalactivity.class ?
Very nice…
Please provide source code as downloadable
please send source code my mail_id..
Is there any way to send or post missing class?
AddAnmalActivity.java
Hai.. Nice code
Can u plz send source code to my e-mail address plz.
sureshpolagani4u@gmail.com
Thanks
It is very useful to me sir..But one java file is missing plze upload that also sir …
JSONParser class is missing in this tutorial.
All tutorials of yours is great.
please remove this error
08-14 13:01:23.656: ERROR/JSON Parser(777): Error parsing data org.json.JSONException: End of input at character 0 of
Can u plz send source code to my e-mail address plz.
pekjah_89@yahoo.com…tq
Hello Joe,
Can u send the addAnimalActivity class and xml file..
Can u plz send source code to my e-mail address plz , i am new i dont know hierarchy of this project, and what about the connection to database through JSON, plz send the me the source code, or if you any webservice for .NET plz pass the link. i am doing one project so i need ASAP
Nice example and very much understandable, but can you plz send full code on my email Id “maxy_liferocks@yahoo.com”, need to learn more and more as there is no end for learning. Thanks in advance.
would definitely appreciate if you could send the missing classes and activities :) love this tutorial studentrob93@gmail.com
I need the source code to download. Please post.
My email is frederico.brigatte@gmail.com
please provide downloadable source code…..
can you send or post missing class?
AddAnmalActivity.java
this is look so nice but can u send source code to my e-mail address plz thanks .
my id rupeshchaudhari05@gmail.com
this is soo nice for a beginner lik me.i need source code can u plz send to my mail
Hey nice example!!can u send me the whole code? i am new to android and i need to develop an app based on database for an assignment in next week. so i would be grateful to u if u can send it to me. please.
nasauda@gmail.com
how to connect with sql server 2008 r2 ?
if anyone has any idea please share with me…
Nice article…….. it would be more useful if it was attached JSONParcing file tooooo…..
kindly send the full code
Thanks for that good tutorial ….could you…kindly forward the full code to ninomoha22@yahoo.com
Appreciation.
<?php
// database settings
define('HOST',"#Your Host name here#");
What to write in HOSTNAME..
thanks for share your tutorial android..
It’s ok…but with using the php ,how can we write…plz send this full source code to my mail….thank you
cool android stuff please forward me full code,,adanabdi32@gmail.com I need for ma project urgently!!!
yutii
not bad site
Hi Joe, I am new to the android and want to add the animals to the database manually and then reflect it when the list animal is clicked. How can i do that can you please help me out with this as i have searched on net but found nothing and i also want that any additional data to the database should be added if any one adds another data. I am very much confused and can you provide me with the tutorial of how to manually add the data in the database ?
Hi, this is a very helpful tutorial. Can you post me the source code please?