Get User Input in Android
I have written an Android Hello World tutorial some time back. Wouldn’t it be nice if we add some simple user interaction to it. As simple as get a text input from user and display it. This tutorial will help you do that and will serve as an introduction to use of Android form widgets.
1. Create an Android Project
To create an android project,
- Go to File menu, then select new -> project or else click new icon in tool bar.
- Select wizard as Android->Android Application project and click Next.
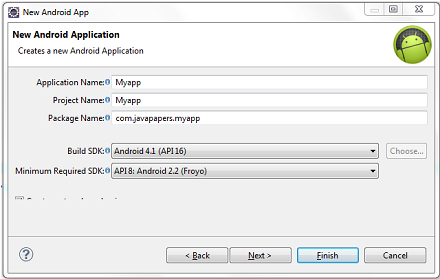
- Create new Application window will be open. Enter Application Name, Project Name and Package and click Next to continue.
- Select launcher icon for your application and click Next.
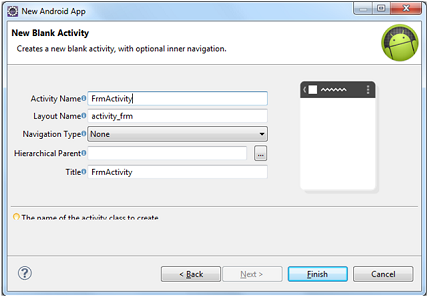
- Select Activity from given two types as Blank activity and Master Details flow activity.
- Enter Activity Name, Layout name and other details to create activity.
- Finally click Finish to complete this step.
Note:
The Blank Activity and Master Detail Flow activity is to capture style property to design good looking app quickly.


App Layout
After completing above, the layout is created as a resource file in this path workspace/GetUserInput/res/layout/activity_frm.xml. By default it contains the following code and we need to work on graphical view of the layout to give control with some basic form widgets.
<RelativeLayout xmlns:android="http://schemas.android.com/apk/res/android"
    xmlns:tools="http://schemas.android.com/tools"
    android:layout_width="match_parent"
    android:layout_height="match_parent" >

    <TextView
        android:layout_width="wrap_content"
        android:layout_height="wrap_content"
        android:layout_centerHorizontal="true"
        android:layout_centerVertical="true"
        android:text="@string/hello_world"
        tools:context=".FrmActivity" />

</RelativeLayout>
2. Add TextView for Label
Select Graphical layout view and remove default string and follow the steps below,
- Drag and drop two Textview(Large, Medium..) from form widget in left panel (One for label of input and the another one for welcome message)
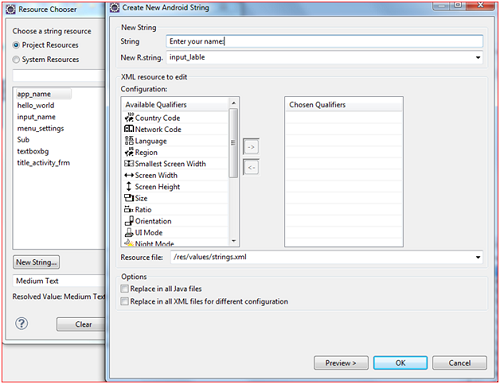
- Select Text property in right panel and Browse to add new String. OnClick browse Resource Chooser window will open.
- Select “New String..” and enter the String to be displayed and resource identifier and click OK.
- Then, choose the newly added resource from ‘Resource Chooser’ and click OK.

Now following code will be created to display Textview,
<TextView
        android:id="@+id/textView1"
        android:layout_width="wrap_content"
        android:layout_height="wrap_content"
        android:layout_alignParentTop="true"
        android:layout_centerHorizontal="true"
        android:text="@string/empty"
        android:textAppearance="?android:attr/textAppearanceLarge"
        android:textColor="#A4C639" />

<TextView
        android:id="@+id/textView2"
        android:layout_width="wrap_content"
        android:layout_height="wrap_content"
        android:layout_alignParentLeft="true"
        android:layout_below="@+id/textView1"
        android:layout_marginTop="23dp"
        android:text="@string/input_lable"
        android:textAppearance="?android:attr/textAppearanceMedium"
        android:textColor="#0099FF" />
3. Add EditText for User Input
Similarly drag EditText box from list of Text Fields and put it in layout next to label. This box has the input type of person name. After this, following code will be generated in the xml file.
<EditText
        android:id="@+id/editText1"
        android:layout_width="wrap_content"
        android:layout_height="wrap_content"
        android:layout_alignBottom="@+id/textView2"
        android:layout_toRightOf="@+id/textView2"
        android:background="#CCCCCC"
        android:ems="10"
        android:inputType="textPersonName" >

        <requestFocus />
    </EditText>
4. Add Button for User Submission
To add button, the form widget menu has to be expanded and button can be dragged from there. Text, text color and background color of the button is changed by ‘Reference chooser’ window and property bar. After creating the button code will be as follows.
<Button
        android:id="@+id/button1"
        android:layout_width="wrap_content"
        android:layout_height="wrap_content"
        android:layout_alignParentLeft="true"
        android:layout_below="@+id/textView2"
        android:layout_marginTop="20dp"
        android:background="#0099FF"
        android:text="@string/sub"
        android:textColor="#FFFFFF" />
5. Button Handler
Till this step, everything is done with design view. But this step is accomplished by adding a Listener into source file(java) which will be in path workspace/GetUserInput/src/com/javapapers/android/form/FrmActivity.java This is the Activity file.
To add Listener following code has to be added,
mButton = (Button)findViewById(R.id.button1);
mButton.setOnClickListener(new View.OnClickListener() {
    	public void onClick(View view) {
      		....
		....
		....
      	}
});
- OnClickListener is event handler which will be invoked on clicking the Submit button.
- View class instance is responsible for the handling the event.
6. Read Input from EditBox Control
User input is read by instances of form controls. The input entered by the user is read by getText() method that is called by Editbox instance mEdit.
Button mButton;
EditText mEdit;
TextView mText;

mEdit   = (EditText)findViewById(R.id.editText1);
mEdit.getText().toString();
And then, the instance of Textview is created to show the welcome message. This will be done by the following code.
mText = (TextView)findViewById(R.id.textView1);
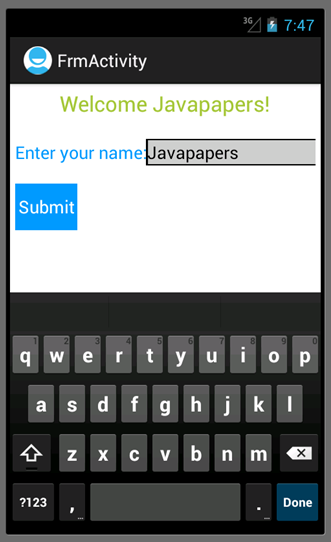
mText.setText("Welcome "+mEdit.getText().toString()+"!");
Complete Source Code and Output
Download Android Project Source Code for Getting User Input
Activityfrm.xml
<RelativeLayout xmlns:android="http://schemas.android.com/apk/res/android"
    xmlns:tools="http://schemas.android.com/tools"
    android:layout_width="match_parent"
    android:layout_height="match_parent"
    android:layout_margin="5dp" >

    <TextView
        android:id="@+id/textView1"
        android:layout_width="wrap_content"
        android:layout_height="wrap_content"
        android:layout_alignParentTop="true"
        android:layout_centerHorizontal="true"
        android:text="@string/empty"
        android:textAppearance="?android:attr/textAppearanceLarge"
        android:textColor="#A4C639" />

    <TextView
        android:id="@+id/textView2"
        android:layout_width="wrap_content"
        android:layout_height="wrap_content"
        android:layout_alignParentLeft="true"
        android:layout_below="@+id/textView1"
        android:layout_marginTop="23dp"
        android:text="@string/input_lable"
        android:textAppearance="?android:attr/textAppearanceMedium"
        android:textColor="#0099FF" />

    <EditText
        android:id="@+id/editText1"
        android:layout_width="wrap_content"
        android:layout_height="wrap_content"
        android:layout_alignBottom="@+id/textView2"
        android:layout_toRightOf="@+id/textView2"
        android:background="#CCCCCC"
        android:ems="10"
        android:inputType="textPersonName" >

        <requestFocus />
    </EditText>

    <Button
        android:id="@+id/button1"
        android:layout_width="wrap_content"
        android:layout_height="wrap_content"
        android:layout_alignParentLeft="true"
        android:layout_below="@+id/textView2"
        android:layout_marginTop="20dp"
        android:background="#0099FF"
        android:text="@string/sub"
        android:textColor="#FFFFFF" />

</RelativeLayout>
FrmActivity.java
package com.javapapers.android.form;

import android.os.Bundle;
import android.app.Activity;
import android.view.View;
import android.widget.Button;
import android.widget.EditText;
import android.widget.TextView;

public class FrmActivity extends Activity {

	Button mButton;
	EditText mEdit;
	TextView mText;

    @Override
    public void onCreate(Bundle savedInstanceState) {
        super.onCreate(savedInstanceState);
        setContentView(R.layout.activity_frm);
        mButton = (Button)findViewById(R.id.button1);

        mButton.setOnClickListener(new View.OnClickListener() {
        	public void onClick(View view) {
        		mEdit   = (EditText)findViewById(R.id.editText1);
        		mText = (TextView)findViewById(R.id.textView1);
        		mText.setText("Welcome "+mEdit.getText().toString()+"!");
        	}
        });
    }
}
Output

Comments on "Get User Input in Android"
Comments are closed for "Get User Input in Android".


I am not an expert in java and thought creating android application was difficult.
Also I feared learning mobile application development as it is completely new for me. I don’t have an android mobile too.
With all these, just reading two articles from your blog made HUGE difference. Your android hello world and this article has given me great confidence. So simple easy to understand and create android application.
Already I am feeling that I know the basics of android. Thanks, Thanks.
Hi Sir,
Great tutorial in simple words,
I am new in android but I know java, In android, designing part is difficult for me Its taking too much time.
so please suggest some designing tricks.
thanks
@Deepesh Uniyal,
To align the components, instead of moving around using mouse, I prefer to use the properties padding/margin/width to fix the position. This will be easier to design.
Property can be changed using design xml(activity_frm.xml) with graphic view.
Drag and drop the needed form controls from left pallet and use property panel in outline view for setting values.
Nice Joe
Nice One.. Thanks a lot..
What is the eclipse version to be used in order to create android app
Nice Work :)
Thanks Joe,This Article is simply superb!!! and very easy to understand.please provide an article about JPA and JDO.
Hi Joe,
This article really nice one for beginners of android application.
Nice effort..
keep wrting i m looking forward for such android example
Good work Joe..! Now you can keep a button for android articles in the main menu.
@Dasarathan,
Eclipse Juno for J2EE programmer will be suitable for android application development.
Hi Joe,
Good work. Really simple and easy to understand.
If possible can you please write about intents intent filters and broadcast receivers in android, as these are very confusing and I am not able to understand them clearly.
Thank You
Hey your guidelines are really helpful for me in my project. My request you to write similar on displaying Indic languages (like Hindi, Marathi, etc) in android. Does android support unicode characters?
@Harshal,
Android has support, sure very soon I will write a tutorial on this.
Thanks Joe.
I am eagerly waiting…….
Thank you so much. Every other tutorial for creating an input text box was confusing. Yours was exactly what I needed. Thank you!
thnksss..nice tutorial.but i need how the user getted input to set large
hi could u tell me how to validate fullname for person field using edit text in android using xml code
[…] in Eclipse and by setting appropriate properties for them. You may refer our previous article on get user input to know about creating these elements in […]
I really liked this tutorial, out of the many XML based input methods available.Although I much prefer coding completely in java, I know this is possible and am curiose if you could do a similar tutorial on that rather than using third-party XML files.
Even so your tutotial was very helpful, thank you.
Not only that but it was well formatted (with syntax plugins etc).
So, thank you but please respond to my request, and I would be extremely gateful if you either made a new tutorial on the subject , linked me to one, or even explained it within a responce.
Thanks,
:)
it is very helpful for me.i am new in both java and android.thanks.
it’s very help full for me..thnax javapaer.com
New one
Hi sir,
Its very nice presentation.
Its very easy to understand.
Thanx javapaer.com.
I’m not that much of a internet reader to be honest but your sites
really nice, keep it up! I’ll go ahead and bookmark your
website to come back later. Many thanks
Hi guys i will start a new company for android teaching methodologies very soon.and you guys may get 100 apps from there it’s completely free.
[…] have already seen this step multiple times. Refer Get User Input in Android tutorial to recollect those […]