Android ListView Tutorial
This is an an Android Tutorial to help to learn about ListView. List view is one of the most used UI component in Android. It helps to display a list of items in a scrollable view. This list view is backed by an adapter which manages the data model to be displayed in the list.

The whole list view comprises of line items. Each line item is a view item. Adapter uses the getView() method to create the individual item of the list view.
ListView layout
<RelativeLayout xmlns:android="http://schemas.android.com/apk/res/android"
    xmlns:tools="http://schemas.android.com/tools"
    android:layout_width="match_parent"
    android:layout_height="match_parent"
    android:paddingLeft="@dimen/activity_horizontal_margin"
    android:paddingRight="@dimen/activity_horizontal_margin"
    android:paddingTop="@dimen/activity_vertical_margin"
    android:paddingBottom="@dimen/activity_vertical_margin"
    tools:context="com.javapapers.android.listview.ArrayAdapterListViewActivity">

    <TextView
        android:layout_width="fill_parent"
        android:layout_height="@dimen/abc_action_bar_default_height"
        android:background="@android:color/holo_blue_light"
        android:singleLine="true"
        android:text="@string/text_view"
        android:textColor="@android:color/white"
        android:textIsSelectable="false"
        android:textSize="20sp"
        android:textStyle="italic"
        android:typeface="normal"
        android:gravity="center_vertical"
        android:id="@+id/textView" />

    <ListView xmlns:android="http://schemas.android.com/apk/res/android"
        android:id="@+id/listview"
        android:layout_width="wrap_content"
        android:layout_height="wrap_content"
        android:layout_marginTop="@dimen/abc_action_bar_default_height"
        android:layout_marginBottom="@dimen/abc_action_bar_default_height" />

    <EditText
        android:layout_width="wrap_content"
        android:layout_height="wrap_content"
        android:id="@+id/editText"
        android:layout_alignParentBottom="true"
        android:layout_alignParentLeft="true"
        android:layout_alignParentStart="true"
        android:layout_toLeftOf="@+id/addButton" />

    <Button
        style="?android:attr/buttonStyleSmall"
        android:layout_width="wrap_content"
        android:layout_height="wrap_content"
        android:text="Add"
        android:id="@+id/addButton"
        android:layout_alignParentBottom="true"
        android:layout_alignRight="@+id/listview"
        android:layout_alignEnd="@+id/listview"
        android:paddingLeft="30dp"
        android:paddingRight="30dp" />

</RelativeLayout>
In the above layout file, ListView is the element responsible for the view.
ListView Activity with ArrayAdapter
There are default layouts available in the Android platform and we are using the simple list item layout to display the list view. In the following Activity, we have shown
- How to use ArrayAdapter with the ListView
- how to detect an item click in ListView
- add items dynamically to ListView
- scroll smoothly to the latest added item in ListView.
- how to remove item from a ListView
package com.javapapers.android.listview;

import android.os.Bundle;
import android.support.v7.app.ActionBarActivity;
import android.view.KeyEvent;
import android.view.View;
import android.widget.AdapterView;
import android.widget.Button;
import android.widget.EditText;
import android.widget.ListView;
import android.widget.TextView;
import java.util.ArrayList;

public class ArrayAdapterListViewActivity extends ActionBarActivity {

    private static final String TAG = "ArrayAdapterListViewActivity";
    EditText editText;
    Button addButton;
    TextView textView;
    SimpleArrayAdapter adapter;
    ListView listview;
    ArrayList arrayList;
    Runnable run;

    @Override
    protected void onCreate(Bundle savedInstanceState) {
        super.onCreate(savedInstanceState);
        setContentView(R.layout.activity_list_view_array_adapter);

        addButton = (Button) findViewById(R.id.addButton);
        textView = (TextView) findViewById(R.id.textView);
        editText = (EditText) findViewById(R.id.editText);
        listview = (ListView) findViewById(R.id.listview);

        String[] values = new String[] { "Lion",
                "Leopard",
                "Crocodile",
                "Bull", "Hyena","Wolf","Lynx","Fox","Rhinoceros" };

        arrayList = new ArrayList();
        for (int i = 0; i < values.length; ++i) {
            arrayList.add(values[i]);
        }
        adapter = new SimpleArrayAdapter(this,
                android.R.layout.simple_list_item_1, arrayList);
        listview.setAdapter(adapter);

        listview.setOnItemClickListener(new AdapterView.OnItemClickListener() {

            @Override
            public void onItemClick(AdapterView<?> parent, final View view,
                                    int position, long id) {
                final String item = (String) parent.getItemAtPosition(position);
                view.animate().setDuration(2000).alpha(0)
                        .withEndAction(new Runnable() {
                            @Override
                            public void run() {
                                textView.setText("Selected: "+ item);

                                //to remove item from list
                                //list.remove(item);
                                //adapter.notifyDataSetChanged();

                                view.setAlpha(1);
                            }
                        });
            }

        });

        editText.setOnKeyListener(new View.OnKeyListener() {
            public boolean onKey(View v, int keyCode, KeyEvent event) {
                if ((event.getAction() == KeyEvent.ACTION_DOWN) && (keyCode == KeyEvent.KEYCODE_ENTER)) {
                    return addItem();
                }
                return false;
            }
        });

        addButton.setOnClickListener(new View.OnClickListener() {
            @Override
            public void onClick(View arg0) {
                addItem();
            }
        });
    }

    private boolean addItem(){
        adapter.add(editText.getText().toString());
        arrayList.add(editText.getText().toString());
        editText.setText("");
        adapter.notifyDataSetChanged();
                listview.smoothScrollToPosition(adapter.getCount() - 1);
        return true;
    }
}
ArrayAdapter for ListView
package com.javapapers.android.listview; import android.content.Context; import android.widget.ArrayAdapter; import java.util.HashMap; import java.util.List; public class SimpleArrayAdapter extends ArrayAdapter{ Context context; int textViewResourceId; private static final String TAG = "SimpleArrayAdapter" ; HashMap hashMap = new HashMap (); public SimpleArrayAdapter(Context context, int textViewResourceId, List objects) { super(context, textViewResourceId, objects); this.context = context; this.textViewResourceId = textViewResourceId; for (int i = 0; i < objects.size(); ++i) { hashMap.put(objects.get(i), i); } } @Override public long getItemId(int position) { String item = getItem(position); return hashMap.get(item); } @Override public boolean hasStableIds() { return true; } @Override public void add(String object){ hashMap.put(object,hashMap.size()); this.notifyDataSetChanged(); } }
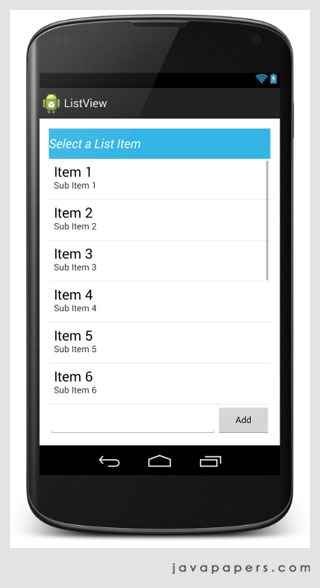
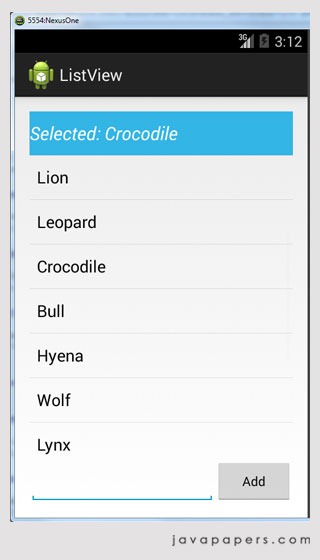
Following is the output of this Android ListView tutorial

Download Source Code
Download Android ListView Project
Comments on "Android ListView Tutorial"
Comments are closed for "Android ListView Tutorial".


[…] the previous Android tutorial for ListView we saw the basics. There we used a layout available as part of the Android and it is fine for a […]
Hi Joe
Thanks for the terrific tutorials.
I have downloaded the files but while running them in eclipse i am getting an error that “error retrieving parent for item: No resource found that matches the given name:Theme.AppCompat.Light.DarkActionBar.” in styles.xml. Please help with that.
[…] we can use a simple list view using a layout already available as part of sdk. Recently I wrote a tutorial for Android ListView and it is a basic introductory […]
[…] We are using a ListView to display the todo list items. We have seen about displaying list items in a previous Android ListView tutorial. […]