Android Cards List View
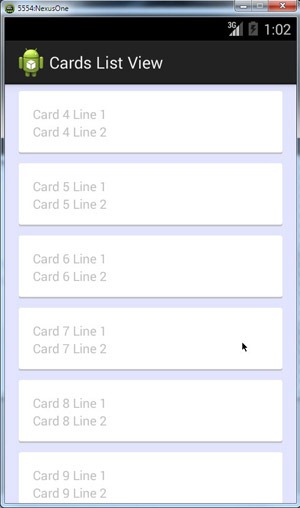
This Android tutorial is to show case how to build an Android activity with card style list view. This is to help achieve a specific styling. This card style is being popularly used to display list style items. We have already seen about creating an Android ListView with custom layout. Code is same as this tutorial and the only difference is the background style.
Cards List View Video Demo
Download Cards List View Project Source
Cards List View Output

Cards List View Example Application
This example application will display a list of cards. Each card is a list item and will have two lines of text displayed. We will create three XML files to style these cards.
1. card_background_selector.xml
This XML is a selector resource which will be used as a background to create the “card” style view.
<?xml version="1.0" encoding="utf-8"?>

<selector xmlns:android="http://schemas.android.com/apk/res/android">
    <item android:drawable="@drawable/card_state_pressed" android:state_pressed="true" />
    <item android:drawable="@drawable/card_background" />
</selector>
2. card_background.xml
This XML is the key file which creates the ‘Card’ style effect and it is used via the above selector file.
<?xml version="1.0" encoding="utf-8"?>
<layer-list xmlns:android="http://schemas.android.com/apk/res/android">
    <item>
        <shape android:shape="rectangle">
            <solid android:color="#CABBBBBB" />
            <corners android:radius="2dp" />
        </shape>
    </item>

    <item
        android:bottom="2dp"
        android:left="0dp"
        android:right="0dp"
        android:top="0dp">
        <shape android:shape="rectangle">
            <solid android:color="@android:color/white" />
            <corners android:radius="2dp" />
        </shape>
    </item>
</layer-list>
3. card_state_pressed.xml
We may require to show a different style when the card is in pressed state. In the below file, we just change the background color and show a different card style on click state. This can be safely omitted if not required.
<?xml version="1.0" encoding="utf-8"?>
<layer-list xmlns:android="http://schemas.android.com/apk/res/android">
    <item>
        <shape android:shape="rectangle">
            <solid android:color="#ca39883d" />
            <corners android:radius="2dp" />
        </shape>
    </item>

    <item
        android:bottom="2dp"
        android:left="0dp"
        android:right="0dp"
        android:top="0dp">
        <shape android:shape="rectangle">
            <solid android:color="#ca4fbb5f" />
            <corners android:radius="2dp" />
        </shape>
    </item>
</layer-list>
4. listview.xml
One important thing to do in the listview is to make the android:divider as @null. Otherwise we will get a divider line between each cards.
<?xml version="1.0" encoding="utf-8"?>

<LinearLayout
	xmlns:android="http://schemas.android.com/apk/res/android"
	android:orientation="vertical"
	android:layout_width="match_parent"
	android:layout_height="wrap_content"
	android:background="#e2e4fe">

	<ListView
		android:id="@+id/card_listView"
		android:layout_width="match_parent"
		android:layout_height="wrap_content"
		android:listSelector="@android:color/transparent"
		android:cacheColorHint="@android:color/transparent"
		android:divider="@null"
		android:dividerHeight="10dp" />
</LinearLayout>
5. list_item_card.xml
Finally, this is where we apply the card background style. In the LinearLayout that is applicable for the each card items, the background selector is applied.
<?xml version="1.0" encoding="utf-8"?>
<FrameLayout
	xmlns:android="http://schemas.android.com/apk/res/android"
	android:layout_width="match_parent"
	android:layout_height="wrap_content"
	android:paddingLeft="15dp"
	android:paddingRight="15dp"
	android:descendantFocusability="beforeDescendants">

	<LinearLayout
		android:orientation="vertical"
		android:layout_width="match_parent"
		android:layout_height="wrap_content"
		android:paddingLeft="15dp"
		android:paddingTop="15dp"
		android:paddingBottom="15dp"
		android:paddingRight="15dp"
		android:background="@drawable/card_background_selector"
		android:descendantFocusability="afterDescendants">

		<TextView
			android:id="@+id/line1"
			android:layout_width="wrap_content"
			android:layout_height="wrap_content"
			android:text="Text line 1"/>

		<TextView
			android:id="@+id/line2"
			android:layout_width="wrap_content"
			android:layout_height="wrap_content"
			android:text="Text line 2"/>

	</LinearLayout>
</FrameLayout>
CardListActivity.java
Activity, adapter and all other java files are same as always. We need not do anything special to get the card style here.
package com.javapapers.android.cardslistview.app;

import android.app.Activity;
import android.os.Bundle;
import android.view.View;
import android.widget.ListView;

public class CardListActivity extends Activity {

    private static final String TAG = "CardListActivity";
    private CardArrayAdapter cardArrayAdapter;
    private ListView listView;

    @Override
    public void onCreate(Bundle savedInstanceState) {
        super.onCreate(savedInstanceState);
        setContentView(R.layout.listview);
        listView = (ListView) findViewById(R.id.card_listView);

        listView.addHeaderView(new View(this));
        listView.addFooterView(new View(this));

        cardArrayAdapter = new CardArrayAdapter(getApplicationContext(), R.layout.list_item_card);

        for (int i = 0; i < 10; i++) {
            Card card = new Card("Card " + (i+1) + " Line 1", "Card " + (i+1) + " Line 2");
            cardArrayAdapter.add(card);
        }
        listView.setAdapter(cardArrayAdapter);
    }
}
CardArrayAdapter.java
package com.javapapers.android.cardslistview.app;

import android.content.Context;
import android.graphics.Bitmap;
import android.graphics.BitmapFactory;
import android.view.LayoutInflater;
import android.view.View;
import android.view.ViewGroup;
import android.widget.ArrayAdapter;
import android.widget.TextView;

import java.util.ArrayList;
import java.util.List;

public class CardArrayAdapter  extends ArrayAdapter<Card> {
    private static final String TAG = "CardArrayAdapter";
    private List<Card> cardList = new ArrayList<Card>();

    static class CardViewHolder {
        TextView line1;
        TextView line2;
    }

    public CardArrayAdapter(Context context, int textViewResourceId) {
        super(context, textViewResourceId);
    }

    @Override
    public void add(Card object) {
        cardList.add(object);
        super.add(object);
    }

    @Override
    public int getCount() {
        return this.cardList.size();
    }

    @Override
    public Card getItem(int index) {
        return this.cardList.get(index);
    }

    @Override
    public View getView(int position, View convertView, ViewGroup parent) {
        View row = convertView;
        CardViewHolder viewHolder;
        if (row == null) {
            LayoutInflater inflater = (LayoutInflater) this.getContext().getSystemService(Context.LAYOUT_INFLATER_SERVICE);
            row = inflater.inflate(R.layout.list_item_card, parent, false);
            viewHolder = new CardViewHolder();
            viewHolder.line1 = (TextView) row.findViewById(R.id.line1);
            viewHolder.line2 = (TextView) row.findViewById(R.id.line2);
            row.setTag(viewHolder);
        } else {
            viewHolder = (CardViewHolder)row.getTag();
        }
        Card card = getItem(position);
        viewHolder.line1.setText(card.getLine1());
        viewHolder.line2.setText(card.getLine2());
        return row;
    }

    public Bitmap decodeToBitmap(byte[] decodedByte) {
        return BitmapFactory.decodeByteArray(decodedByte, 0, decodedByte.length);
    }
}
Card.java
package com.javapapers.android.cardslistview.app;

public class Card {
    private String line1;
    private String line2;

    public Card(String line1, String line2) {
        this.line1 = line1;
        this.line2 = line2;
    }

    public String getLine1() {
        return line1;
    }

    public String getLine2() {
        return line2;
    }

}
Download Cards List View Project
Comments on "Android Cards List View"
Comments are closed for "Android Cards List View".


Just Excellent..!! Its really helpful and save my time.
Thanks Joe.
Thanks, I will give cards list a try this night.
Thanks Joe for this nice example. Could you please attach all the android project files so that we can add it to eclipse.
Thanks
works !! great. thanks.
Thanks a lot.. This is very helpful. Kudos
Great tutorial..
Very Helpful.I am making a gd app in which I want all topics to be in cardlayout which I have implemented watching ur tuts.
Now want to implement an onclicklistener for card items.How to do ?
Thanks
a very easy and simple tutorial with demonstration,
searching for this tutorial, thanks a lot.
Thank you very much for this tutorial.It helped me alot.